Open WebCam by using javaCV

  1. Today I will show you how open the webcam by using javaCV

  2. Open your last netbeans project

  3. Add a button and I name it as Open WebCam


  4. Double click on the button and goto button click event

  5. Enter following codes
    • To open the webcam
    •   
      CvCapture capture=opencv_highgui.cvCreateCameraCapture(0);
       
      Here 0 is a parsing a variable. o is for webcam. If you using another camera you can use 1 or 2 or something.
    • Next we have to set the height and with of camera frame
    •   opencv_highgui.cvSetCaptureProperty(capture,opencv_highgui.CV_CAP_PROP_FRAME_HEIGHT,480);
              opencv_highgui.cvSetCaptureProperty(capture,opencv_highgui.CV_CAP_PROP_FRAME_WIDTH,480);
       
    • Next we have to make IplImage
    •   IplImage img=opencv_highgui.cvQueryFrame(capture);
       
    • Next add a canves to show the images
    •   CanvasFrame frame= new CanvasFrame("WebCam Loading");
       
    • Now run the programm.
    • Can you see, when you try to close can't close the window. As a solution for it you can write above code in this part
    •  Thread x= new Thread(){
        public void run(){
        }
        
        //above codes here
       };
       x.start();
       

    Introduction to openCV (Java)

    1. Today I will show you how using openCv with java

    2. OpenCV is a very use full tool for working with images

    3. Normally openCV is using with c++. But we can use openCV with java

    4. First you have to download and install the openCV

    5. You can download it from following link

    OpenCV

    When you installing the openCV, it will asks folder to extract. Then choose C drive and extract them.

    6. Then you have download few jar files. Download them and extract them

    7. Go to following link and download them(only the following files)

    JavaCV


    8. After you extract it you can see "javac-bin" folder and "javacv-cppjars" folder

    OK. Now open neatbeans and make new project

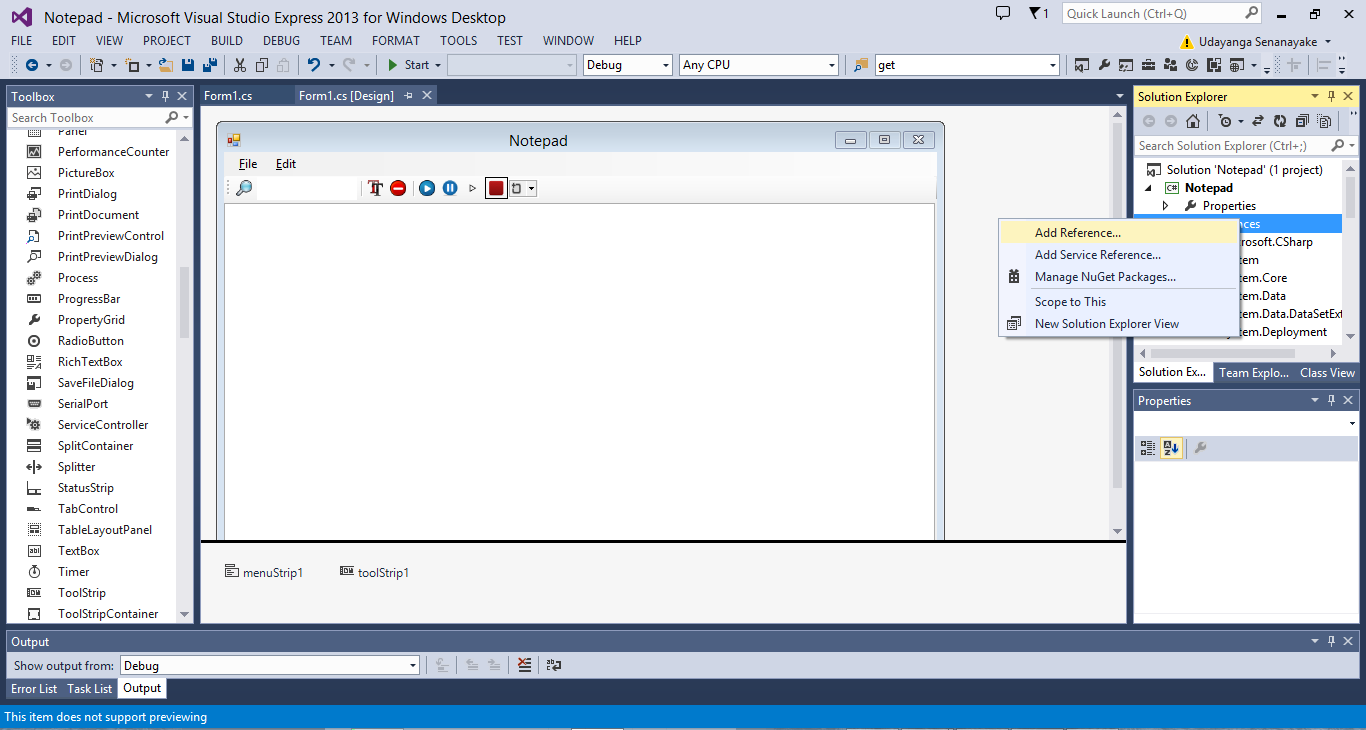
    9. Now you have add few libraries

    10. Right click on libraries and choose "Add Jar/Folder"


    11. Now open the javac-bin folde. Select javacpp.jar,javacv.jar jar files and if you using windows choos javacv-windows-x86.jar and javacv-windows-x86_64.jar files.if you usin another operating system please choose jar file by compareing with your operating system.
    12. Select them and click open.
    13. Same way go to javacv-cppjars folde and choose jar files with your operating system name.

    14. Now simply add a button to jframe. Double click on it and got click event of button

    15. Type the following codes
    
    
    IplImage image=cvLoadImage("C:\\Users\\Udayanga\\Desktop\\Internet\\img.png");
            final CanvasFrame canvas= new CanvasFrame("Demo");
            canvas.showImage(image);
            canvas.setDefaultCloseOperation(javax.swing.JFrame.EXIT_ON_CLOSE);
    

    16. If you see some erro right clic on code area and choose Fix Imports

    17. Now run your programm.


    By using openCV we can make very interesting applications. Follow is some of them.


    Speech text in Notepad (C#)

    Today I will show you how speech text in Notepad
    1. I added four buttons to toolStrip
    2. Change button's names as play,pause,resume,stop
    3. Then you have add some library
    4. Right click on Referrences choose Add References...
    5. Then search for theSystem.Speech

    6. Select it and press OK
    7. Then import the following libraris
    8. using System.Speech;
      using System.Speech.Synthesis;
    9. Now make a globle variable as follow. At the end of the main function you can declera it.
    10. SpeechSynthesizer rd = new SpeechSynthesizer();
    11. The put the following codes
    12. Play
      if(GetRichBox().Text !="")
                  {
                      rd.Dispose();
                      rd = new SpeechSynthesizer();
                      rd.SpeakAsync(GetRichBox().Text);
                  }
                  else
                  {
                      MessageBox.Show("Notepad is empty !!");
                  }
      Pause
      if(rd !=null)
                  {
                      if(rd.State==SynthesizerState.Speaking)
                      {
                          rd.Pause();              
                      }
                  }
      Resume
      if (rd != null)
                  {
                      if (rd.State == SynthesizerState.Paused)
                      {
                          rd.Resume();
                      }
                  }
      Stop
      if(rd!=null)
                  {
                      rd.Dispose();
                  }
    13. Now run your programm. Enjoy!!

    Make a auto complete text box (C#)

    Today I will show you how make auto complete text box
    1. Select the textBox goto Propeties.
    2. Then search for AutoComplete propetis.
    3. You can see 3 of propeties.
      • AutoCompleteCustomSource
      • AutoCompleteMode
      • AutoCompleteSource
    4. First you have to choose a AutoCompleteSource. There are many AutoCompleteSources
    5. I choosed CustomSource
    6. Then you have to choose AutoCompleteMode
    7. I choosed Suggest
    8. Then you have to select the AutoCompleteCustomSource
    9. If you click here you can see small button. By clicking it will show a small dialog box.
    10. You should enter the words for sugget to Auto fill.
    11. Now you can see it is working.
    12. If you use Append as AutoCompleteMode
    13. If you use SuggestAppend as AutoCompleteMode
    14. Next post I will show you How speech text in Notepad.

    Change fonts in text box (C#)

    Today i will show you how change the Fonts of Notepad
    1. First add a TooStrip
    2. If you can't add toolStrip (if you got error)please right click on tabb and Cut it. Then add the toolStrip and paste the tab again
    3. Then add a button to toolStrip

    4. You can add a image to the button by, right click -> Set Image...
    5. Import a image and press OK
    6. Double click on the button and put this codes
    7.  FontDialog fdb = new FontDialog();
              fdb.ShowColor = true;
                  if(fdb.ShowDialog()==DialogResult.OK & !string.IsNullOrEmpty(GetRichBox().Text))
                  {
                      GetRichBox().SelectionFont = fdb.Font;
                  }
    8. Now run the programm
    9. You can highlight and change the font

    10. Next post I will show you how make Auto complete text box

    Rename tab as opened file name (C#)

    This post I will show you how rename the tab name as file name.

    1. First you have to import some libraries.
    2. Import them as follows
    3.         using System.IO;
              
    4. Go to Open submenu code part.
    5. before the close() the Open file dialog put this code
    6.             tabControl1.SelectedTab.Text = Path.GetFileName(ofd.FileName);
              

    Next we will see how change tabb's name after the save it

    1. Goto Save submenu's code part and put the following code parts
    2.         tabControl1.SelectedTab.Text = Path.GetFileName(sfd.FileName);
              

    Remove opened tab (C#)

    This post I will show you how remove a opened tabs from your notepad
    1. First add abutton
    2. You can add a image icon to it or add shortcut key for it(You can change it yourself)
    3. I name it as close.
    4. Add following codes
    5. TabPage ct = tabControl1.SelectedTab;
                  tabControl1.TabPages.Remove(ct);

    Search a words and highlight them (C#)

    In this post I will show you how search a word and highlight it
    1. Open the last C# project
    2. Add a TextBox and a Button
    3. I change the button's name as Search
    4. Double click on the search button and put the following codes.
    5.             int index = 0;
                  string temp = GetRichBox().Text;
                  GetRichBox().Text = "";
                  GetRichBox().Text = temp;
                  while (index < richTextBox1.Text.LastIndexOf(textBox1.Text))
                  {
                      
                      richTextBox1.Find(textBox1.Text, index, richTextBox1.TextLength, RichTextBoxFinds.None);
                      richTextBox1.SelectionBackColor = Color.GreenYellow;
                      index = richTextBox1.Text.IndexOf(textBox1.Text, index) + 1;
                  }
              
    6. Now run your programm
    7. You can see the letters was highlighted, I typed
    8. You can change the Events of the text box
    9. Goto propeties -> Events
    10. Search for a KeyPress event.
    11. Double click on it and goto code part of it.
    12. Copy the all code of search button and paste it in KeyPress event.
    13. Now you don'd need the search button. If you type a key, it will search for it.
    Next post I will show you how remove the tabs.

    Make events to menus (C#)

    In this post I will show you how make events to menu
    1. Goto Toolbox and drag and drop a TabControl
    2. We need a plain tabb. Because right click on middle of the tabb and select Delete
    3. Delete default two tabbs
    4. Click on tabb and go to Propeties -> Dock -> Fill
    5. Double click on the New submenu and enter this codes
                  TabPage tp = new TabPage("New");
                  RichTextBox rtb = new RichTextBox();
                  rtb.Dock = DockStyle.Fill;
                  tp.Controls.Add(rtb);
                  tabControl1.TabPages.Add(tp);
          
    6. You have to make a new function for text box. here we are using RichTextbox
    7. This is code for it
    8.         private RichTextBox GetRichBox()
              {
                  RichTextBox rtb = null;
                  TabPage tp = tabControl1.SelectedTab;
                  if(tp!=null)
                  {
                      rtb = tp.Controls[0] as RichTextBox;
                  }
                  return rtb;
              }
          
      Now let's code the others
    9. Double click on the submenu item and enter following codes
    10. Open
      OpenFileDialog ofd = new OpenFileDialog();
                  ofd.Filter = "Text File(*.txt)|*.txt";
                  if (ofd.ShowDialog() == DialogResult.OK)
                  {
                      System.IO.StreamReader sr = new System.IO.StreamReader(ofd.FileName);
                      GetRichBox().Text = sr.ReadToEnd();
                      sr.Close();
                  }
      Save
      SaveFileDialog sfd = new SaveFileDialog();
                  if (sfd.ShowDialog() == DialogResult.OK)
                  {
                      System.IO.StreamWriter sw = new System.IO.StreamWriter(sfd.FileName);
                      sw.Write(GetRichBox().Text);
                      sw.Close();
                  }
              
      Exit
      Application.Exit();
              
      Undo
      GetRichBox().Undo();
      Redo
      GetRichBox().Redo();
      Cut
      GetRichBox().Cut();
      Copy
      GetRichBox().Copy();
      Paste
      GetRichBox().Paste();
      Select All
      GetRichBox().selectAll();
    11. We can add a filter when open and save a text file.
    12. To do this add following code to Open and Save submenus
    13. Open
      ofd.Filter="Text File(*.txt)|*.txt";
                  
      Save
      sfd.Filter="Text Files(*.txt)|*.txt";
                  
    You can see when the programm is openning there was no new tabb. To make that we can make a new function by using code we use for New menu. So make a new function and call it when programm is open . Follow the following image guids

    Next post I will show you how search a word and highlight them

    Add images to menus & make short cut keys to menus (C#)

    Last post I show how create the menu and how separate them.

    This post I will show you how add image icon to the menus and how make a short cut key for them.
    1. Click on menu item and goto Propeties -> ShortcutKeys
    2. Select the ShortcutKeys to shortcut
    3. Add ShortcutKey for all submenu items as follows
      • New - Ctrl+N
      • Open - Ctrl+O
      • Save - Ctrl+S
      • Undo - Ctrl+Z
      • Redo - Ctrl+D
      • Cut - Ctrl+X
      • Copy - Ctrl+C
      • Paste - Ctrl+V
      • Select All - Ctrl+A
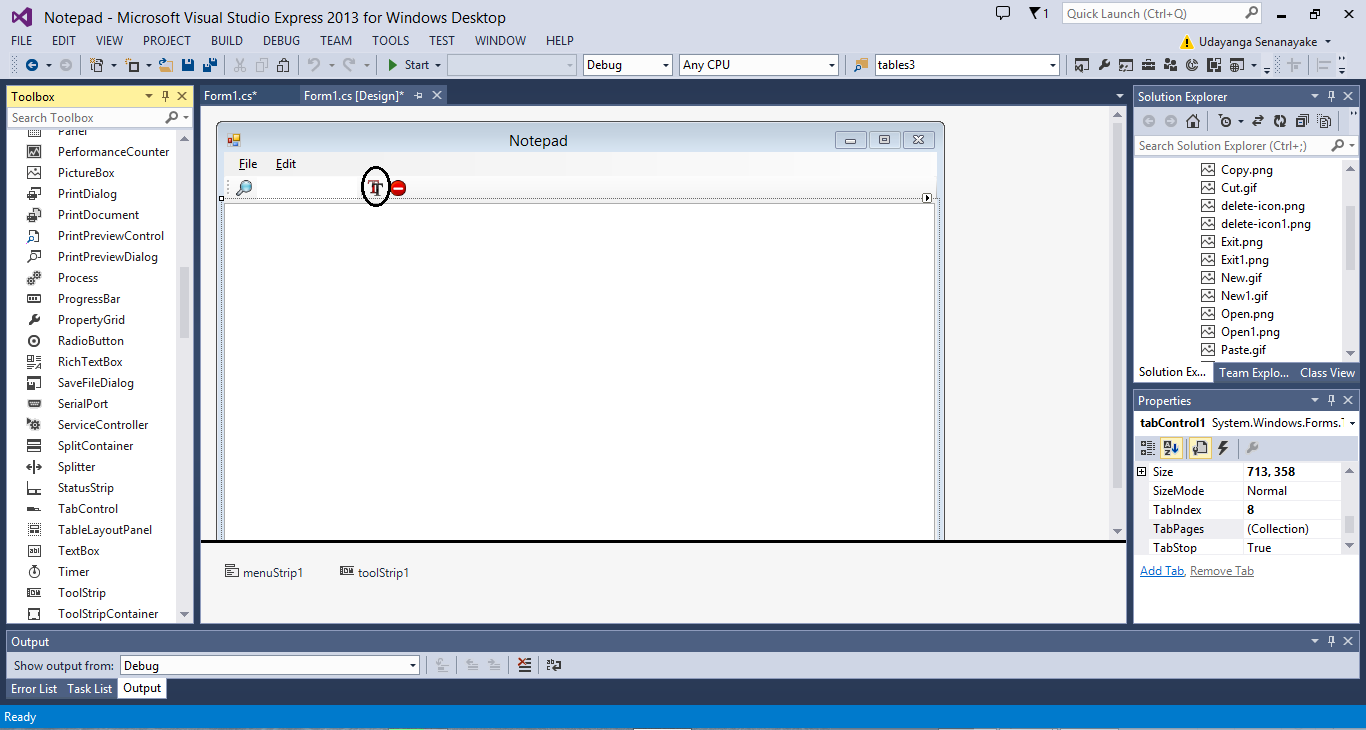
    4. Now let's see how add icon to the menus.
    5. Select the submenu item and goto Propeties -> Image
    6. Click import and choose the image icon
    7. Then select the image and click OK
    8. Add icon to the all menu items
    Using following link you can download icons I used hear.

    Icon

    Using this link you can search any icon and download them

    IconAchive

    Next post I will show how make events to menu.

    Make a menu bar for the Notepad (C#)

    1. Open Visual studio and make a new Visual C# project. I named it as Notepad
    2. After the project is created, click on the form and go to propeties. Change the Text as Notepad.
    3. Now you can see your form name changed to Form1 as Notepad
    4. Then drag and drop a MenuStrip
    5. Add Menus, File and Edit
    6. Add sub Menus
      • File
        1. New
        2. Open
        3. Save
        4. Exit
      • Edit
        1. Undo
        2. Redo
        3. Cut
        4. Copy
        5. Past
        6. Select All
    When you adding the menus and submenus, goto propeties -> Text change the name of menus and submenu by adding "&" mark to the front of the name.As a example change New as &New

    Reason for this is ,open the notepad in your windows computer press Alt button. You can see it's manus are changing. That mean, the first letter is underlined.


    When you press the underlined letter's key by using key board that manu item will working.
    So add the & for all the menu and submenu items.


    Do not need add & mark front of the Text. If it is there were two items start with same letter you can choose another letter.As a example for the Cut and CopyI use y for Copy
    Now you can run your project and check if it is working.
    1. You can add separator to separate the submenu items.
    2. Right click on where you want to add the separator. insert -> Separator
    Next time we will see how add images to the menu items and how create a short cut keys to the menu items.

    Open a document by clicking a button(Java)

    1. Open a NetBeans project
    2. Add new Frame
    3. I added Tool bar and few buttons hear
    4. When you click 'About' button the pdf file will open
    5. Double click on the button and goto button's actionPerform
    6. Add this code
    7.         try{
                  Runtime.getRuntime().exec("rundll32 url.dll,FileProtocolHandler "+"E:\Projects\Blogs\Java\Post\advance\openDocument\\me.pdf");
              }
              catch(Exception e){JOptionPane.showMessageDialog(null, e);}
      
          
    8. Give your file path correctly !
    9. Important

      • You can open any document using this code.
      • Give your file path corectly

    Show Database data with a Table(Java)


    1. Open your last NetBeans project
    2. Add a Table
    3. Add a button and name it as 'show data'
    4. Right click on Libaries and add rs2xml.jar file
    5. You can download it by following link
    6. rs2xml.jar
    7. Import following librarie
    8.         import net.proteanit.sql.DbUtils;
              
    9. Double click on button and add following codes
    10.             try{
              String sql="select * from EMPDATA";
              pst=conn.prepareStatement(sql);
              rs=pst.executeQuery();
              jTable1.setModel(DbUtils.resultSetToTableModel(rs));
              }
              catch(Exception e){
              JOptionPane.showMessageDialog(null, e.getMessage());
              }
              finally{
                  try{
                      rs.close();
                      pst.close();
                      
                  }
                  catch(Exception e){}}
              

    Important

    • If you want to update your table in many time you can make a method for it. As a example if you update a data in your table you can call that method ontime.
    • If you make a method named updateTable(), you can use it as "updateTable();" anyware in your programm(only in this frame).
    • You can add this method in your main class(after initComponents();)your data will show as soon as your programm opening.

    Update data in the Database(Java)


    1. Open the last NetBeans project
    2. Add a buttons name it as Update
    3. Double click on buttons and add following codes

      Update

              
                try{
                  
                  
                  String val1=txtID.getText();
                  int v1=Integer.parseInt(val1);
                  String val2 =txtName.getText();
                  String val3=txtAdress.getText();
                              
                     String sql="update EMPDATA set ID='"+v1+"',NAME='"+val2+"',ADRESS='"+val3+"'";
                     pst=conn.prepareStatement(sql);
                     pst.execute();
                     JOptionPane.showMessageDialog(null, "Upadated");
              }      
              catch(Exception e){JOptionPane.showMessageDialog(null, e);}
              

    Add data to a Database(Java)


    1. Open the last NetBeans project
    2. Add new jFrame Form(I name it as table)
    3. Design it as following
    4. I added 3 Text Fields and 3 Labels
    5. Change label's names as ID, Name, Adress
    6. Change text field's variable name as follow
      • txtID
      • txtName
      • txtAdress
    7. Import the following libraries
    8.         import java.sql.Connection;
              import java.sql.PreparedStatement;
              import java.sql.ResultSet;
              import javax.swing.JOptionPane;
      
              
    9. Defind the following variables in the 'table' class
      (My jFrame name is table)
    10.     Connection conn=null;
          ResultSet rs=null;
          PreparedStatement pst=null;
          
          
    11. After the defin variable there is a method named "table()"
    12. Add the following code there
    13. conn=dbcon.Connect
    14. Here,
      • dbcon is we made datasabe connection class name
        If you don't know about it please follow this link
    1. Double click on the "Add" button and add the codes below
    2.         try{
                 String sql="insert into empdata(ID,Name,Adress)values(?,?,?)";
                 pst=conn.prepareStatement(sql);
                 pst.setString(1, txtID.getText());
                 pst.setString(2, txtName.getText());
                 pst.setString(3, txtAdress.getText());
                 pst.execute();
                 JOptionPane.showMessageDialog(null, "saved");
             }   
             catch(Exception e){JOptionPane.showMessageDialog(null, e);}
             
    3. Now run your project
    4. In the running time if you got error like this,
      • go to 'service'
      • Right click on Java DB
      • Click 'Start Server'
    5. Now run the project again

    Impotent things

    • Add your own data fields
      This programm consits only the basic
    • To add this data to a database you must have this data fields in your database
      If you don't know to make a database, please follow this link